
INTRODUCTION
Have you always wanted your very own speaker to stream and jam to your favourite tunes? If yes, look no further! In this review, we’ve gotten our hands on the Pirate Radio kit, a little internet-connected Raspberry Pi Zero W-powered speaker. We'll be assembling it today to create a DIY speaker!
The Pirate radio makes use of Pimoroni’s new pHAT BEAT DAC and stereo amp, and the Raspberry Pi Zero W that has a built-in wireless LAN and Bluetooth, saving us the trouble of requiring additional WiFi and Bluetooth dongles. By programming the Raspberry Pi Zero W, the speaker would be able to serve as an online radio station, and stream music via AirPlay and Spotify Premium. I can definitely see how this can be appealing not just for children, but educators and adults alike.
As I’ve always wanted a speaker to play my favourite songs, and have heard about various interesting Raspberry Pi projects before (like how it can even function as game and wireless print servers), I was really excited to not just get my hands on a speaker, but to even assemble one myself.
If you’re interested in assembling your own speaker too, do note before we start that quite a number of costly additional components outside of what is provided in the kit will be required (refer to the section below for more details). But fret not if you don’t have access to soldering, as you can always find non-soldering alternatives to the pin headers online!
Now, let’s get started!
INSIDE THE KIT
Here is the Pirate Radio Kit from Pimoroni that I was handed

First impressions - considering that it contains so many components and is supposed to turn out as a radio, I was pleasantly surprised by how relatively small the packaging was. This made it really portable, and super convenient for me to carry back and forth between the office and home, when I was assembling the kit.
Opening up the box, we find many components. I was slightly intimidated at first when I saw so many components, especially with some of them looking so similar. How do I tell which is which? Thankfully, by following the assembly steps and pictures on the Pimoroni website, I was able to differentiate them.
I have labelled the components in the picture below for reference, but perhaps it would have been better if the components were labelled. Number stickers and a small handout with the numbers and corresponding names of the parts could possibly have helped in making this part fool-proof.


Reading the back packaging, I was initially slightly thrown off by the list of additional components required. Soldering especially, may not be accessible to many (though there are thankfully non-solder header pin alternatives online as mentioned), and components like the keyboard, mouse and display are expensive to acquire for just single-time use if you don’t already own them. Before proceeding, do make sure that you have all of these additional materials, or are okay with purchasing some of the ones that you don’t have!

(Sidenote: It’s preferable to use a keyboard / mouse combo for the best experience, as there is only one free port on the Raspberry Pi Zero W to connect either the keyboard or mouse. But if you don’t have one, that’s okay too! I worked mostly with just a keyboard and navigated around with the Tab button. Alternatively, you can also alternate connecting the mouse and keyboard to the OTG adapter on the Raspberry Pi Zero W.)
ASSEMBLING PIRATE RADIO
BUILDING THE PIRATE RADIO STRUCTURE
Now that we’ve unboxed the components, let’s get started assembling our pirate radio! I liked that there were relatively detailed assembly instructions on the Pimoroni website with photos below the steps, and that the link to the assembly instructions were provided on the kit cover. But to make this process more fool-proof, I would have personally preferred it if it was slightly more detailed with more step-by-step pictures, or if the components were labelled as mentioned above. As I was slightly confused when assembling, it took me slightly longer than the 30 mins assembly time stated. Nonetheless, following instructions on the Pimoroni website, this was a relatively straightforward process.
SOLDERING PI ZERO PHATS:
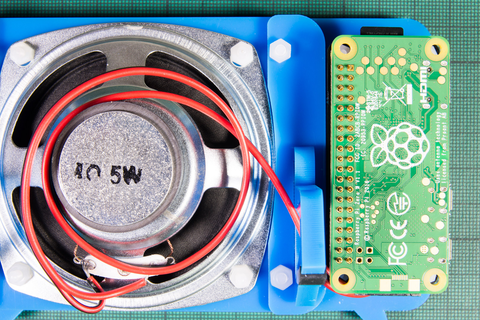
Now, let’s move on to soldering the pin headers to the pHAT BEAT and Raspberry Pi Zero W! Once we’re done, we’ll attach the soldered pHAT BEAT and Raspberry Pi Zero W components to the assembly set up above to complete the hardware assembly.
As an amateur with no prior soldering experience before this, I was admittedly slightly intimidated and worried when I realised that I had to solder 40 pins onto the pHAT board and another 40 pins onto the Raspberry Pi Zero W. How do I possibly get started?
Thankfully, there is a soldering tutorial on the Pimoroni website to get us started. Being a complete newbie at soldering, I found it overall quite useful in getting me started, as I would have been at a complete loss if the instructions had simply been to “solder the 2 x 20 female pin header to the pHAT board and 2 x 20 male pin header to the Raspberry Pi” otherwise. But as the tutorial was not catered for this specific pHAT board model, I was initially quite confused regarding the orientation in which I should insert the pin header into the pHAT board and Pi. I also faced a similar concern for the Raspberry Pi as there were no instructions for soldering the Pi.
Additionally, as the tutorial did not have a picture of both the solder and the soldering iron being placed to the pins during soldering, I even initially heated the pins with just the iron and no solder at all… I didn’t damage the pins thankfully, but I should have known better. Thankfully, with lots of help from one of my colleagues, I managed to solder it in the end.

Nevertheless, this could possibly be a concern for beginners with no concept of soldering, especially children. It would have been a great help if there were specific soldering tutorials for the Pi and pHAT board for this project specifically, but the existing soldering tutorial helped me get started nevertheless. One important thing to note before starting is to make sure that the tip is shiny before use. If it is dull and not shiny, it will not conduct heat and solder well. Here’s a very handy soldering guide I found on the Internet, summarising the key tips for soldering.

COMPLETING ASSEMBLY:
Now, let’s put the soldered pHAT board and Pi together with the assembled set up from earlier. This will complete our hardware assembly setup.
I personally found this part relatively straightforward, as it was just putting all the already assembled components together. The instructions for this part on the Pimoroni website were also very useful for me, and I found them informative yet succinct at the same time.

Hurray, now we’re done with the assembly. Congratulations!
CODING
SETTING UP RASPBERRY PI:
Before we move on to coding the Pirate Radio, we’ll need to set up the Raspberry Pi.

Personally, I found this part to be the most challenging and confusing out of the whole process. This also took up most of my time as I jumped around a lot between websites, lost. This was mostly issues with installing Raspbian to the SD card then connecting the Raspberry Pi device to a monitor and coding with an external keyboard. As a beginner to Raspberry Pi knowing nothing other than having heard that it can serve various cool functionalities, I was very confused with regards to installing Raspbian, and the hardware side of things - powering the whole radio and connecting the Pi device to an external monitor and keyboard to program it. Initially, I wasn’t even aware that I had to install Raspbian on a SD card and plug it into the Pi device. In confusion, I even connected the Raspberry Pi device to my laptop with the USB cable and attempted to run the lines of code on Terminal... Then after realising that I had to download Raspbian to a microSD card for the Pi device, I did so but did not know that I needed to connect an external monitor and keyboard to launch Raspbian, rather than doing so on my laptop, leaving me lost as to how I could program the radio from there. Thankfully I had the help of many people around the office, and was able to resolve these hardware issues.
This may also be confusing for other beginners who are not familiar with Raspberry Pi. In hindsight, most of my issues above were mostly due to confusion when I was switching between the different websites. To avoid such confusion, after clicking the link to NOOBS installer from the Pimoroni Pirate Radio Internet Radio / Spotify Streaming / Airplay website, simply download the .zip file and follow the detailed ‘software setup guide’ or setup videos linked on the site. Only after that is complete, then head over back to the Pimoroni tutorial to continue installing the necessary plugins required for the Pirate Radio kit. Perhaps it would have been great if this flow was specified more explicitly on the Pimoroni website, to minimise the confusion and make the process more user-friendly and accessible for beginners. Once I followed this flow, things were a lot simpler for me!
One thing to keep in mind though, is that the Pirate Radio requires numerous hardware components. While some components like the HDMI adaptor and OTG cable are provided, there are many other hardware components that are required but not provided. As they include items like external monitors and keyboard, this project may be more suitable for those who own computers rather than laptops.

Overall, I do think that the project provides a great experience to work with Raspberry Pi nonetheless, once the instruction flow is made clear to ease the transition between the Pimoroni and Raspberry Pi tutorials. If you have the necessary additional hardware components, I do think that there is no harm trying this project out!
Raspberry Pi Setup Instructions:
I wanted to do some tinkering so I installed the full Raspbian version to install the full Raspberry Pi desktop, instead of Raspbian Lite. However with full Raspbian, I realised that the Pirate Radio is only able to play local music files on the SD card, and not with the Internet Radio, Airplay or Spotify. Do note that it only allows for playing local music files through the Raspberry Pi desktop, without the Internet Radio and other functionalities. If you wish to access the other functionalities, you may want to explore installing Raspbian Lite instead. Using the guide on the website, I found this a lot more intuitive and easy to follow from here on. I really liked the guide and found it very useful.
Do note that this entire software installation and set up process will take some time though, especially if you are setting up Raspberry Pi for the first time. It took me about an hour to get past the software installation window (from the picture above), then about 1 hour 20 minutes to check for software updates, and about 5 minutes to Restart the Pi to complete the installation process. This adds up to about 2 hour 25 minutes in total, before I could start programming the Pi - but that said it varies according to Internet connection, and to be fair you can mostly leave it alone during the set up. This process was also very easy to follow.

If your Raspberry Pi desktop seems to hang and get stuck on a certain page with no progress bar loading though, please do not panic and spam your keyboard by typing in random letters in an attempt to load the page faster (like I was embarrassingly guilty of), and don’t disconnect your Pi from the power source either! Doing the above will reset all your setup process above. Simply stay calm and just follow the step-by-step instructions on the Raspberry Pi website!
PROGRAMMING THE RADIO:
Now that we’re all set installing the necessary software on our Raspberry Pi device, let’s begin programming!
I found this part relatively straightforward as well. I mainly explored the Internet Radio tutorial from the Pimoroni website, and found the commands to type in easy to follow. Pimoroni has also created a nifty one-line installer to install everything needed to get the radio to work, which I found really handy and helpful in simplifying the whole process. I also enjoyed the explanations under the ‘What the installer does’ section, to help better understand the commands that we run.

An area of concern though, would be that the Raspberry Pi Zero W has limited connection ports, as there is only 1 free port to connect either a USB keyboard or mouse. I couldn’t figure out how to work a wireless mouse or keyboard with the Pi, so I mostly used the keyboard, and navigated around the desktop with the ‘Tab’ button and arrow keys on the keyboard.

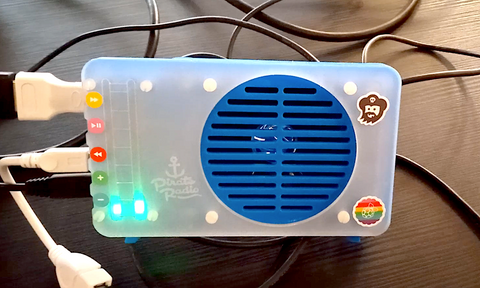
Additionally, after working with the full version of Raspbian, I realised that following the Pimoroni tutorial, the Pirate Radio is only able to play local music files from Accessories > File Manager, but not function as an Internet Radio, or with Airplay. I’m not sure if it would have been able to work with Raspbian Lite instead. Nonetheless, the Pirate Radio can still play local music files on the Pi device, and the VU meter on the front changes colour display according to the volume, which I really liked and found very cool and visually appealing. I also really enjoyed the process of working with and navigating Raspberry Pi desktop overall - something that I’ve never tried but found really cool!
Some Troubleshooting Tips:
If you encounter problems with audio and the VU meter display, here are some tips:
- If the Pirate Radio VU meter lights up as the files are played but no sound is plays out loud,
- Check the soldering on the Raspberry Pi Zero W device. You may need to re-solder some of the pins. To determine which pins to resolder, you can refer to https://pinout.xyz/pinout/phat_beat# for the layout of the pins on the pHAT board, and re-solder the relevant pins linked to the issues you have with the Pirate Radio.
- Make sure the button on the physical pHAT board is slid to the left to change to speaker mode, so that it will play the music out loud.
- If the Pirate Radio does not light up at all and no sound is played, you may have to recheck the lines of the code that you executed above, eg. if you typed them in correctly, if there was no error message returned and you successfully executed the line, and if you had reboot your Raspberry Pi desktop.
FINAL PRODUCT AND VERDICT
Don’t forget to decorate your radio with the stickers provided too! And we’re done, congratulations! Now your radio will light up and sing to your favourite tunes for everyone around you to enjoy!

VERDICT - TO BUY OR NOT TO BUY?
Overall, I found the kit an interesting experience that exposed me to soldering and working with Raspberry Pi (both the Raspberry Pi Zero W device and the Raspberry Pi desktop), things which I have not tried before. It was an overall enjoyable experience that exercised my problem solving thinking and problem solving skills, and I like how soldering and Raspberry Pi were incorporated in a fun DIY radio speaker project. I do think that this provides a good platform to introduce soldering, circuitry and Raspberry Pi to children and beginners, and hence could possibly be a kit for parents and teachers to consider. I can definitely see the appeal of this to children as well - being visually appealing, and able to give children a definite sense of accomplishment upon completion. However due to the soldering and software side of things involved, this project may not be one that children can work independently on, particularly for those who are unfamiliar with Raspberry Pi, but perhaps more as a guided project, to ease the learning curve and process.

However, this project certainly requires time to build, hence I would not recommend it to those looking to build quick projects. If educators are considering incorporating this into their curriculum, it may be better to structure building this project as a series of lessons, as there is quite a fair bit to cover - from basic assembly, to soldering, software installation and programming. Individuals may also need quite a fair amount of time to work on this project - as a complete beginner to soldering and Raspberry Pi, I unfortunately took quite a number of days working on this, as I had to troubleshoot and resolder along the way too. Nonetheless, the amount of time required pays off as it is overall an exciting and fulfilling experience upon completion, that also taught me problem solving skills. If parents are looking to purchase this kit for their children, they may need to be prepared to invest some time into exploring this project with their children, as this project may not be something that can be easily finished within a few hours, and would require parental guidance, especially for soldering (if going with the soldering option as provided in the kit) and setting up Raspberry Pi.
In terms of the making experience, I was truly fortunate and am really grateful to have been able to ask for help from so many people in the office when assembling the project (don’t worry, this was before the whole circuit breaker period!), and hence could complete the project - from Steven and Sean’s help with the soldering iron, to Akmal’s help connecting my Raspberry Pi to the monitor, Hetty, YJ and Steven’s help connecting the monitor to the keyboard. It was certainly not the easiest project to assemble for me as a beginner with no prior experience in both soldering and Raspberry Pi!
I liked that there were easily accessible instructions online by Pimoroni for the different steps along the way. But I would have preferred it a lot more if the instructions were printed out in a booklet form possibly, and packaged with the kit, rather than being scattered across several online websites. This could be confusing for children or beginners as well. I personally found navigating between the different online tutorial pages slightly confusing, when there wasn’t an explicit navigation guide. Physical assembly for example, had 2 website guides alone. Additionally, I would also have preferred it if the instructions were more catered for the kit. The soldering tutorial for example, was not catered for soldering the pHAT beat and Raspberry Pi Zero W, leaving me confused when I was unsure which way to insert the header pins into boards to solder them. This would also have helped in setting up the Raspberry Pi and connecting the radio to the Pi.
Another drawback of the kit is that there is quite a bit of additional equipment required, aside from the components provided. These additional equipment include things like a microSD card, external computer monitor / television screen and keyboard, which are expensive and not recommended to purchase for one-time use for just this project alone. Given that the kit costs $67 by itself, cost may be a consideration in completing the project. Thankfully there is a non-soldering alternative online that those without access to soldering equipment can get their hands on.

To summarise, here are the pros and cons for this project:
Pros:
- Suitable for children, individuals and teachers alike - anyone who wants some hands-on and coding exploration
- Exposes you to soldering and using Raspberry Pi Zero W in a fun way, to build an interactive and useful project
- Exposes you to basic coding on the Raspberry Pi desktop terminal in a user-friendly way
- Exercises your problem solving thinking and problem solving skills
- Relatively low cost for a speaker, offering decent audio quality for the $67 price tag
- Offers a non-soldering alternative that can be purchased online
- Eye-catching visuals with the VU meter on the side that changes colour according to volume played through the speaker
Cons:
- May not be accessible for all - involves soldering work, and additional items that may be costly if you don’t already own them / will not use them outside of this project
- Soldering iron alone: from ~S$50 onwards
- microSD card (min 8GB): from ~S$20 onwards
- USB microSD card adapter: from ~S$6 onwards
- 2A microB USB power supply: from ~S$10 onwards
- Keyboard, mouse, monitor: easily add up to >S$100
- May not be as user-friendly or suitable for children to try out independently
- Instructions are on various online sites, not all instructions are specific to the Pirate Radio kit components
- Requires time to complete - not for those looking for a quick project
- Only able to play local music files with Raspbian downloaded
- Not really portable - requires the speaker to be connected, not a wireless option
Overall if you can get access to the equipment required, I do think that the Pirate Radio kit is worth a try nonetheless for not just children, but parents, teachers and individuals alike. Happy Tinkering!
This review was written by Hong Ying, interning with us while deciding on her university course.