
Preface
Back in 2014-2015 was when I first heard of the 3D pen, likely off a reddit post somewhere talking about new emerging technologies. I remember being amazed, at the ability to just shape and draw 3D objects in thin air that easily and excitedly thinking, “This is it… this is the future of ideation, art & sculpting.” Then I never heard of it again for about 5 years. So, when I finally got the opportunity to try out the 3D Tinkerpen myself, I jumped at the chance.
Some backstory to this now; I’m currently interning at Tinkertanker as a marketing intern for my poly diploma, but back in secondary school I used to take art as a module as I always had an interest for it. I have not really had the chance to practice art in a few years, but I still sketch and doodle when I have free time. So, as person who had an interest in art & design, and had a vague idea of what I thought a 3D pen was, this will be my honest review of it, as well as showcase what a 3D pen is actually capable of.
The Box & Contents


The Box itself has a simplistic design, and contains a couple rolls of filament, an instruction manual, some easy template examples to follow, a slightly opaque plastic card (Which I didn’t know what the use of was at this point) and of course, the pen and its power supply.
The Pen
There I was... finally… holding onto the pen that had my little 14 year old mind quaking at the thought of drawing stuff in the air, and the only thought in my mind at this point was..
“Wow, this thing is huge.”


The pen was much thicker than what I expected, having to grip it like a proper pen felt a bit weird when I was just getting used to it. But after holding it for a while I got used to the grip, and actually found out that the design of the pen is meant to suit your hand, as the buttons are easy to press with your thumb and index finger resting on it, and the screen being on the side facing you lets you easily read and check it as you draw.
Now a 3D pen, I have come to find out after googling to try and give a proper explanation, is basically a hot glue gun. You heat up the filament that you place within the pen as you press the button on the side that extrudes it, which comes out as melted plastic of the filament that you use to draw with. After that dries, voila, you have just created 3D art!

After reading the Instructions, I plugged in the pen, pressed the button to turn it on and let it heat up, and took my first steps into using the art tool of my youthful dream.
Loading & Using the 3D Pen

The filament that is given with the Pen is PCL, which stands for “Polycaprolactone”, which is slightly different from usual filament that is used for 3D printing applications. This specific type is much more flexible, and durable compared to other types, and the most unique property is its low melting point, which for the specific spool given is only 85 Degrees Celsius. Thus, is perfect for making long lasting yet mendable designs, as well as much safer for kids to use.
The pen also has the option to switch to more traditional filaments like PLA , which would set the melting point within to a higher default, making it viable for different types of plastics, which I found really useful.

This was also the point when I found out what that plastic sheet inside was used for! You use it to place over the templates that were given, or any other designs/sketches that you’ve drawn to help you trace over it with the pen easily, so that you won’t have to get the exact measurements of the drawing, or make a mess on any of your nice paper or tables. This was never explicitly stated in the kit, so I thought I’ll be able to give you guys a heads up.
Level 1 – Gem Biscuit
This is the beginner level template that was given for the 3D pen, tracing and drawing a simple biscuit. My first actual test in using the pen…


It was horrible.
So I realised my mistakes in that in that I wasn’t constantly moving the pen, so the filament strings out at points where I didn’t want it to be, and by the time it dried I would have either needed a pair of scissors or a heat gun in order to fix it. Another point to note is that the filament is extremely sticky and gooey when it’s melted, so be careful that strands of it sticking to your pen doesn’t ‘hair out’ causing these flowing strands of plastic drift out from your artwork or design.
There was also the problem where I traced a part of the highlight in the biscuit art, but when I peeled it off after it’s dried, that specific part didn’t actually connect with the rest of the work. I think that’s one of the problems when drawing these kinds of 2D objects with the pen is that you can’t expect it to work as if it has a background to it.
So, lessons learned from my mistakes, I moved on to level 2.
Level 2 – The Merlion
As I looked at the Image for level 2, I realised that the same mistakes were going to happen with parts of the art not connecting. So I did some clever reworking to fix that issue..

It looked pretty bad, but hey, at least it’s all in one piece!
So, I used the 3D pen to connect the floating pieces of the art work together, so that it can all be connected into 1 big piece when it dried and can be peeled off. It worked.. but my Merlion now looks really sad..
I also learned to be more in control of the pen when tracing the design but ran into another problem where the auto-feeder gets accidently turned on. So now one part of its main has a blob on it cause I couldn’t stop the filament in time.
Still couldn’t fix the tiny plastic hairs sticking out, unless I had a blow drier or tiny scissors on hand but oh well, onto the main course!

I decided now was the time to switch out the filament to a different colour, and found this neat thing where if you switch out the colour before the whole spool is finished, you get this mixed colour that comes out.
Level 3 – Eiffel Tower
Here it is, the meat and bones of what the pen would be used for, making a proper 3D object.
The true feat of mastering the 3D pen, and that is to make an Eiffel Tower.
And gosh…. It took so much damm time!


Seriously! The pervious 2 levels took a combined 15 minutes at most, while this project took at least 45-50 minutes! I guess that is be expected when you have to trace the design 4 times in order to make the creation. Especially with how intricate the design was for each piece, by the 3rd time my hand was already starting to strain, and it was getting dark outside.
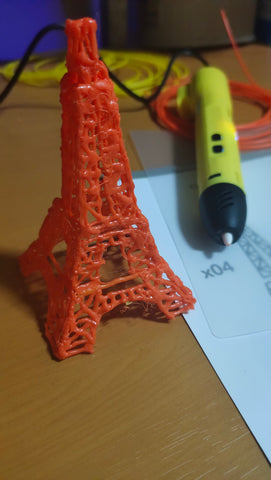
But when It was finished, I felt really really proud and accomplished. Sure it was leaning slightly to the side, and not all the pieces matched up perfectly, but I did it! I made an actual 3D artwork after putting so much effort into it and nothing can take that away from me.

I realised that level 3 is where it really teaches you the essence on how to use the 3D pen, and that is not to actually draw stuff in thin air when you have nothing. But instead, to get out some paper and plan out dimensions of what you want your 3D object to look like, draw the pieces that you’ll need, and to stick them all together to make the final product/artwork, much like the Eiffel Tower Design.
I really wished that I had more time with the pen at this point to try and draw out a design or artwork of my own. But it was getting late, and I had to get some rest to prepare myself for what was coming next…
Teaching how to use the Pen
So, I’m not sure how (Thanks Akmal), but I was dragged into helping to run a camp lesson to teach primary school kids how to use the 3D pen. I was told since the model I’m reviewing would be the same one that was being used to teach the kids, it would be perfect for me to help out, as well as to give more flavour to the review I’m writing.
So for the lesson itself, we had the student learn how to use the pen to make themselves a pair of safety googles, which would help them get immersed into the other lessons where they would learn robotics & electronics.


I’ll be honest, I thought I would be woefully unprepared for this, having used the Pen for only about a day, but I really enjoyed myself teaching them about the pen, and watching them be really excited, scared and determined as they used them for the first time. They all did great, doing the same mistakes I did but actually having us instructors to help them. I even learned some tips for myself as well through the things that they did, such as reinforcing the PCL by adding multiple layers so that it can become more ridged, as well as other tips that I’ll be sharing below.

I even made a pair myself! And I think this was my best creation yet, learning from all my mistakes and working out how I really wanted my design to work and look like. In the end I’m really happy how this one turned out and could actually see the improvement through the stuff I learned to get better with the pen.
Tips & Tricks
After using the 3D Tinkerpen for a significant amount of time (about 2 days) I would say I have a fair grasp of it, and since this is a review, I felt it would be useful to give some tips and notes that I learned while using the pen itself:
- You can adjust the speed of how fast the filament comes out by pressing the 2 buttons that are closer together on the pen, I had trouble controlling the speed of the filament and only found out about the feature after I was mostly done using it
- There is a feature that lets you automatically feed the filament into the pen by double pressing the extrude button. This is a double edge sword, as while it is useful to easily feed new filament into the pen without much hassle, it can be sudden and bothersome when you accidentally press it, making it so that your pen continuously extrudes even when you’ve let go of the button, potentially ruining whatever careful product design you may have been working on
- Make sure to check that you are on the right setting for the right type of filament, as the different temperature may affect the melting point of the plastic, and could pose a danger
- Right-handed V.S Left-handed. I learnt this while teaching the students during their lesson, as for those who are right-handed like myself, the button to extrude would rest on the thumb to press as you draw, while for those who are left-handed it would be the index button that would be used to draw near the top of the pen, so do that note of that
- Patience is key! You can’t become Picasso the moment you pick up the pen, so practice and take it slow. Learn to work with the filament so that it goes where you want it to go and not the other way around. Taking time to make sure your design looks accurate in the end make it that much more satisfying to finish
Conclusion
So, although a 3D pen doesn’t draw or bend in the air like I thought It would, all-in-all the 3D Tinkerpen in my opinion is a good, and affordable pen to get you started on learning how to actually use a Pen for 3D designing. It has simple controls and interface, comfortable handling, easy to replace filament steps, and safe to use for most ages. Although I wished I had more time to experiment with the medium, I can tell that with the short time I had with it, it excels at being able to be get to the point quickly, and makes designing and drawing said designs into reality that much easier. I would recommend anyone who hasn’t tried a 3D pen yet to give it a whirl. :D
Extra Notes
While learning to use the pen, I’m not sure if the google ad gods read my mind or something, but on YouTube one of the recommendations that was shown to me was a video called “I spent 51 hours learning to use a 3D pen. Progress from beginner to 3D pen robot” by build-a-skill. The video gave a very in depth look at how a 3D pen was from a complete beginner and showcased many similar mistakes and misconceptions that I had while learning to use the pen. The guy gave great tips & explanations as well as the progress he was able to make by going non-stop in trying to get better at the Pen. I highly recommend it, and after looking at the video, gave me more motivation than ever to be better than the Pen. Who knows, they might just be able to make a 3D artist out of me yet.
https://www.youtube.com/watch?v=GcONBptTGbk
Written by Tan Jun Wei (Jackie), currently interning at Tinkertanker