
The Strawbotics Starter Kit is designed for children to showcase their creative minds by assembling a moving creation by connecting straws and plastic connectors to a motor which is powered by 2 AA batteries. Sounds simple enough, but it takes quite a bit of tinkering to get the robot moving!
Inside the package
Inside the package, there are fifty-four connectors of various shapes, and one DC geared motor, a AA battery case as well as five straws.
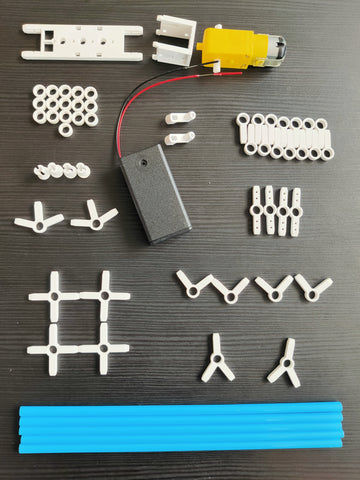
Unfortunately, there are no instructions in the package.
Thankfully, there are some online resources which provide information on piecing the parts together if you search for, Strawbotics Starter Kit.
Assembly
Assembly of the Strawbotics, it certainly seems like there is room for improvement. For instance, keeping the motor together with the battery holder required the use of a rubber band, and I feel that it could be an improvement in the design to allow the battery holder to be held together with the motor without a rubber band.

The connector parts, however, do fit with each other nicely. For example, the two connectors holding the motor clicks nicely with each other and is secure to the point where I am unable to separate them even if I wanted to.

After snapping the parts holding the motor together, I had to attach the battery holder to the motor, sadly with the help of a rubber band. I noticed that the wires to be connected to the motor are quite flimsy so you would have to be careful not to bend them excessively, or they might be damaged. The two pieces of spindle-looking like connectors fit into the side of the motor, and from here on, it's all up to the individual's creative mind to build the toy.
Making
I have to admit I'm not the most creative person, but I tried my best to build a few different robots to experiment with Strawbotics.
My first robot was a failure as it could barely move a centimetre forward. I noticed the wires lost contact with the motor due to the movement of the robot, which stopped it from moving any further. The two swinging limbs of the robot seem to go off sync upon contact with the ground causing it to look like it was swimming on the ground. This may be due to the straws being of different length when I cut them. As the saying goes, measure twice cut once applies well in this situation.
Another thing I realized, this kit encourages trial and error by making you try different designs and straw lengths to build a working robot. However, there are only five straws provided, making resource management essential. Planning your design is critical else you may end up wasting material and fall short of finishing your creation.
For my second robot, I made changes to the problems identified earlier.
With regards to the loose wiring, I coil the wires around the plates of the motor to keep it connected even if there is vigorous movement. As for the limbs that were not in synced, I adjusted the length of both sides to match each other and added one more horizontal component to both front limbs to prevent it from going off sync.
Lastly, I added a long straw that connects the two hind limbs so that they don't get rotated and stay together.
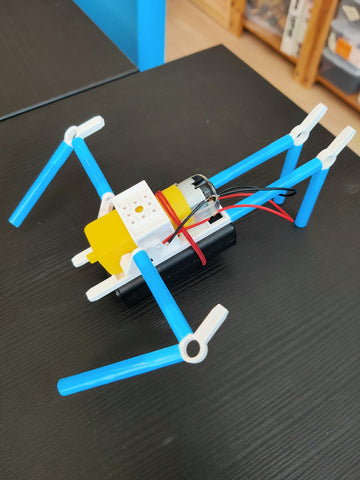
(My second robot, hind limbs unstable without the support)
Sure enough, the second robot was more stable than the first and no longer looked like a mad man swimming on the ground. The wires are also firmly attached to the motor and did not come off as easily as compared to the first robot. However, while the hind limbs did not stick together, it seems that they were placed too close to one another, making the robot a little shaky. Nonetheless, I was impressed that with such minor changes, the robot was already able to make significant progress in terms of movement.
One thing I noticed that affects the movement of the robot is the terrain it is on. On a smooth surface such as marble floor tiles, it is quite difficult for the robot to stride forward as there is not enough friction between the floor and the straws though a wooden table works fine.
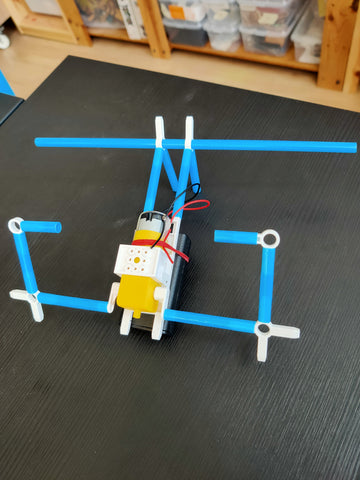
For the final robot, I placed the hind limbs wider apart to improve the stability. I also added more connectors for the front limbs which addressed the problem of them going off sync, which still lingers despite the horizontal components.
(My third robot)
Finally! The robot moved steadily, and the front limbs did not go out of sync.
CONCLUSION
The number of different builds you can make with the Strawbotics Starter Kit is quite limitless, and you are not bound to a specific type of straw. Any plastic straw should work, though its rigidness will affect your creation.
The Strawbotics Starter Kit certainly will be able to stimulate the creative thinking of children tinkering with it, and I enjoyed tinkering around with it.
A too long didn't read (TLDR) to sum it up:
Pros
- Connectors connect securely with one another
- Stimulates creative thinking
- Encourages tenacity through trial and error
Cons
- For younger kids, the wires may be difficult to attach to the motor
- The number of straws limits trials and errors process
—
This post was written by Yu Hao, awaiting university to start, majoring in Computer Science degree programme at NTU.